Tile Lippage and Ways to Prevent It
Tile lippage is undoubtedly one of the worst problems with tile installation and is, unfortunately, one of the most common ones. You may think that you can ignore a slight unevenness during installation, but that can lead to significant problems in the future. So how to prevent lippage when laying tile? Avoid making the mistakes that commonly result in lippage in the first place. Whether you are DIYing a part of the floor or wall of your house or a contractor working on a paid tiling project, you need to be mindful of a few things. Just avoiding the wrong things can help prevent tile lippage more than doing all the right things.
So, let’s find out ways to prevent your tiling project from ending up being aesthetically unappealing.
Steps to Prevent Lippage When Tiling
Here are some simple steps to take to ensure that there is no lippage in your tile.
- Start by inspecting the subfloor that is going to be your foundation. You want a surface that is even. If your surface is uneven, to begin with, lippage is inevitable, even at the hands of the most practiced tile installers. To examine the levelness of the subfloor, place a small leveling tool in the middle point of the room. If your subfloor is made of plywood and warps at the center, you need to strip it away and replace it with a new one.
- The best tiles to work with to avoid lippage are those with chamfered edges. It will work if your choice of tile is large. Chamfered-edged tiles are beveled at the rim. That is integral to a seamless and even fit. Those with sharp corners often cause the adjacent tiles to butt up against the corners leading to unevenness. Hence, double-layer beveled tiles are favored by contractors.
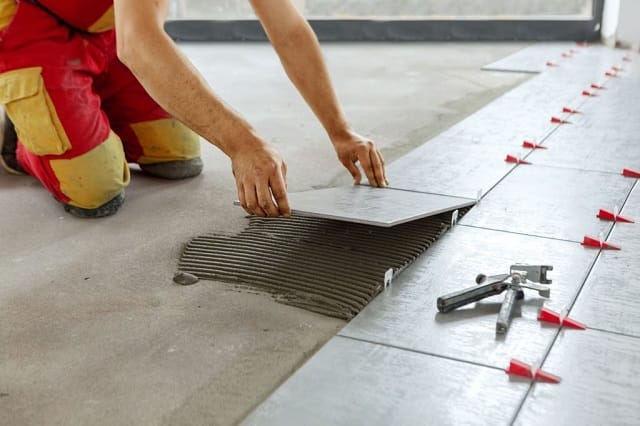
- When installing the tiles, you need to start by double-checking the application of the thin-set adhesive. For smooth and seamless installation, you want a base of thick and even layer of thin-set. The application should be such that it provides adequate coverage for the installation. Ensuring this can be pretty easy with a simple trowel. Just apply and spread it out in vertical and horizontal directions, and you have an even layer of thin-set. Now start laying your tiles.
- Part of a tile installation is good joint creation. When laying the tiles, you should create proper joints. The joints should be straight and hold the tiles securely in place. At any point, if you feel tempted to make the joints narrow, resist the urge because narrow grout joints are often the cause of tile lippage even though they look visually appealing. The science behind this is surprisingly simple. The closer you bring the tiles together, the more a lippage appears clear to the eye due to sudden unevenness in the plane.
The Magic Tool to Prevent Lippage
Now there is a shortcut to preventing lippage at minimum effort. Use a lippage leveler. There are many in the market, but the ones like Spin Doctor Tile Lippage Leveling System are better than others. But before you randomly choose one, make sure that you have read up the benefits of tile lippage leveler systems. That way, you will know if you have picked a good product or not. Another way to ensure a good purchasing choice is to scour through product reviews. The feedbacks left by other users should give you some idea as to whether a product is worth the money.