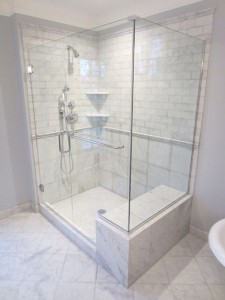
Ceramic tile shower seats are great additions to showers, and can be a true focal piece. People use them for stability, to display decorative toiletries, and to make showering habits easier, like shaving your legs.
Tile Shower benches can be installed along the length of a wall or in the corner, whichever is preferable, and with tiles that complement the design of the wall and the floor of the shower pan. For something truly eye-catching, a slab of marble can be laid on top.
First Step to Installing Tile Shower Seats and Benches
The first step to installing shower seats or benches is to prep for the install. Determine if you’ll be using a pre-fabricated bench or building one yourself. Using a pre-formed shower bench will save you not only a lot of time, but also a ton of savings in labor. You won’t have to build the bench yourself or have your workers take on the task. Pre-formed benches also provide a much more secure installation than traditional methods.
At Tile Pro Depot, we sell Laticrete Hydro Ban pre-formed shower benches and pre-formed shower seats. They are both made from high-density expanded polystyrene coated with a factory applied waterproof finish. Using these benches and seats allows for a high quality, rapid shower installation. Plus, they’re backed by a Laticrete Lifetime Warranty!
Second Step to Installing Shower Seats and Benches
When you’re ready to install your tile shower bench or seat position it inside the already waterproofed shower, taking into account how the tiles will run along and with the bench. Frame it against the wall and ensure that the walls are square and plumb so the seat will fit properly, and that the area is level.
Apply a medium bed, polymer fortified mortar to the floor under the bench and on the walls behind the bench. Slide the seat into place, flatten the ridges to ensure complete coverage of thinset, and remove excess thinset after the seat is firmly in place. Once it’s installed, it’s time to start tiling.
The tile shower seat should be tiled first to ensure the wall material locks in the top of the seat and secures it. If the seat tiles aren’t locked into the wall they can separate over time due to strain. Treat the front and sides of your bench just like you do the walls of the shower by covering it directly with thinset and laying your tile. Once the bench is tiled you can begin tiling the walls and floor. Take care to follow the pattern of the tile on the seat when you’re installing the tile on the walls.
Once all of the tile is laid and cured, the shower seat is ready for use! It will undoubtedly be a focal point of the shower, and something that will get lots of use.
Preformed Tile Shower Benches and Seats for Sale
At Tile Pro Depot, we have a variety preformed shower benches and seats sure to make your installation easier, more efficient, and a real pleasure for your customers. We also carry preformed shelving and all of the necessary waterproofing tools for the job.
Visit our website to place an order and to view our wide selection of products. If you have any questions, feel free to contact us online or by phone at 844.751.2625.
Do you have outlets in Australia?
Sorry,
No outlet in Australia.
For my shower bench top I’m using a quartz slab, does this bench top need to be installed before tiling the shower walls?
If I’m having porcelain slabs on walls in shower, and a full slab of cultured marble on the floor, when do I put the shower bench in?